Water is the second most essential element required for human survival, placing second only to air. You can die in minutes without oxygen, and in just a couple of days without any water.
Every human being alive instinctively understands and craves water on a deeply primordial level, and rural folks more than most understand how critical it is to account for a steady supply of water, drinkable water, at all times and most of all when in an emergency situation.
No matter who you are and no matter where you live sooner or later trouble is going to find you. It might be a comparatively small disaster that turns your life upside down for a couple of days, or it could be an absolute cataclysm that completely changes your country, society or even the world.
If we are all being honest pretty much everybody living in the First World takes clean, drinkable water for granted as all we have to do is duck into any building, anywhere, and throw open a tap to get cool and safe water gushing out in abundance.
That isn’t the case everywhere in the world, and even in our own countries. Modern public water as a utility is completely reliant upon legions of dedicated workers and complex infrastructures to get that water where it needs to go safely.
For those living in less developed nations or just far away from major settlements, water must come from where it has always come from for much of human history: out of the ground, and specifically out of a well.
For thousands and thousands of years, human beings have been digging wells in every imaginable climate and circumstance, and though we rely on teams of specially trained workers to do so today, there is a high likelihood you might have to undertake this arduous task yourself in a SHTF situation.
It is way past time for you to add this critical skill to your survival repertoire. In this article I will provide you with tips, advice and procedures to help make your own well digging venture a success.
Table of Contents
Well Water for Self-Reliance
The humble well may get nary a thought when you consider it against the technological marvels of our modern era, but it is not hyperbole to say that wells make human settlement and, indeed, much of civilization possible.
Generally speaking, when it comes to gathering or otherwise procuring water, for much of our shared history humanity has relied on three major sources:
- above ground freshwater repositories like ponds, lakes and rivers,
- catching precipitation in the form of rainwater and,
- the subject of this article, wells used to gather water from underground sources called aquifers.
Many of the largest human settlements originally coalesced near permanent major bodies of water like lakes and rivers not only for the easy transport of people and goods they provided, but also for a virtually endless source of water to be used by the people.
Any settlement that wanted to put down roots well away from a large and reliable body of water would have to rely on the catching of rain, not always dependable and indeed rare in some locales, or provide their own ready source of water in the form of a well.
As you might expect, cultures around the world have relied on wells and continue to, even if they supplement their stores with intricate and expensive rain catching systems. Only wells are even close to being reliable enough to furnish enough water to take care of a large group of people, their livestock, and other tasks.
Beyond their reliability and suitability to human installation, wells also have an advantage in that they will typically produce water that is on average safer and of higher quality than that that can be taken from above ground sources, even the most pristine ones.
Popular imagination often informs one’s opinion that babbling brooks and springs found high up in the mountains or in untouched woodlands are some of the purest sources of waters around, but like any large and open container they often get contaminated.
Dirt, debris and the bodies of insects and animals alike (to say nothing of their droppings) can easily render such a water source unsafe to drink.
Contrast that with well water, especially water taken from a deep well. Water drawn from a deep well is often found safe and secure under many impermeable layers of rock and soil far below the surface in the breast of the Earth.
While this does not guarantee they will not become contaminated (or already are), statistically they produce water of far greater purity that is less likely to be infected with any biological agent.
The most common contaminant for water drawn from a deep well is actually mineral accumulation. Most often, this mineral accumulation only lends the water an unpleasant taste, and makes it “hard”.
But no matter what kind of well is installed, the goal should be that of providing a generally reliable and generally safe source of water that can be drawn on demand and used for any purpose, including hydration.
For this reason, a thorough working knowledge of primitive and/or basic well installation techniques and procedures is important to make sure you are thoroughly prepared for a societal collapse scenario.
Well Components and Nomenclature
A well is just a hole in the ground, one that reaches a source of water beneath the surface. Actually, there is a little bit more to it than that, at least if you want a well that is safe and will last for a long and productive term of service.
Whether or not you plan on installing your own well is definitely in your best interest if you know what you are talking about, and the key to understanding anything is to understand its components, what they do and how they are used in discussion of the topic. Wells are definitely no different in this regard.
The list below is comprised of common well nomenclature, and all the components below are found in the vast majority of wells, though not all. Certain more specialized well applications might have parts and concepts that are not featured on this list, though they will be a rarity.
Well Hole
This is the heart of the well, the shaft that is bored into the earth until it reaches the water source far below. The well hole can be excavated through a variety of methods, drilled, dug or driven. Once in place, water can be brought up and retrieved at the surface one way or another.
Well Casing
The well casing is a manufactured wall or liner that seals the interior of the well against the earth that surrounds it. The well casing can be made of almost anything, often brick, wood or stone in the case of primitive wells while modern wells will use some form of plastic or metal.
This also gives the well structure in addition to helping prevent contamination. In the case of a driven well, the well casing is itself pushed into the ground to form the well hole.
Well Curb
The well curb is the raised piece on the surface that surrounds the well hole. The purpose of the well curb is to help prevent people and animals from accidentally walking over and falling into the well hole, and also help prevent a certain amount of contamination from sweeping into it from the surface.
The well curb is also the foundation for anything that will be built on top of the well opening itself, such as the steining and any smaller structure that will provide a mount for the well cap and any mechanism through which a vessel might be manually lowered.
Steining
The steining is the solid wall that rises above the well curb on the surface over the well hole. It can be round or square, and be thought of as an extension of the well casing. It is assembled piece-by-piece or installed as a manufacturer component.
The steining helps keep people and animals from falling into larger wells and also helps prevent contamination by providing a mount for the well cap. A steining should be sturdy since it will often have other structural components attached to it as well as people leaning on it when drawing water from the well.
Well Cap
The well cap is the part placed over the very top of the well opening. It is intended to prevent contamination and accidents by keeping animals and people along with the debris from falling into the well from above ground. This component is essential for maintaining safety as well as the quality of your water.
Pump
A common fixture for modern wells pumps are used to move water from the water source to the surface and absence of a vessel used for manual retrieval.
Depending upon the type of well and its depth, a pump might be submersible and lowered all the way into the well until it is in the water source far below, or installed above ground.
Aside from electrical or gasoline powered pumps, mechanical pumps might be used in certain instances, or in places that lack technological infrastructure.
Well Screen
The well screen is another critical component and is vital for ensuring that what water is drawn out of the well is as free of debris and contaminants as it can be before making its way to final filtration, if applicable.
This device usually attaches to the intake of a submersible pump, or at the very bottom of the casing with a driven well where it prevents rocks, pebbles, sediment insects, and other nasty stuff from heading out along with the water being drawn.
Vessel
The vessel is simply a container that is used to manually retrieve water. If you have ever seen a well that has a bucket on the end of a rope that is raised and lowered with a winch or even with by hand, you have seen a vessel before.
Ancient vessels were made out of everything from earthenware and other pottery to wood or even animal skins.
Aside from being less efficient and far more laborious then a pump system, vessels introduced another way by which contaminants can reach your water source and being typically kept outside at all times keeping the vessel clean and germ-free is far easier said than done.
Those are pretty much all the basic well components you need to know about. The subsequent sections of this guide will help fill you in on the types of wells, how they are dug and how you can install them yourself. All of this will make a lot more sense now that you know what these components are.
Well Installation Methods
The most obvious method by which a well can be installed – tons and tons of hard digging – is not the only way by which you may install one.
In various times and places throughout history, unique cultures have put their own spin on the excavation and installation of wells, from the brutally simple to the surprisingly elegant.
They all have advantages and disadvantages, and some are more or less viable depending on what tools and technology you have available or just how much manpower you have.
It is in your best interest to know more than one way by which a well could be installed in case you find that your own circumstances or terrain make one variation unsuitable or even impossible.
Remember, the biggest part of being a prepper is having a back-up plan, and often a back-up plan for that for when things don’t work out the way you hoped it would. Read on for more information!
Shallow Wells and Deep Wells
If you ask a layman they will probably tell you that all wells are pretty deep. To a person that is not versed in well nomenclature and lore, any deep hole that runs far under the surface of the Earth probably counts as deep.
In a literal sense, they are not wrong, but not when we’re discussing wells the terms “shallow” and “deep” are classifiers.
Shallow wells and deep wells both have advantages and disadvantages that you must be acquainted with, so you know how to assess the land you are working on against the risks you face.
Today, shallow wells are the rarer type of well, and is the name given to any well that bottoms out at 50 feet or shallower.
A shallow well reaches water that is situated above the first impervious layer of soil and rock below ground, making it easy to get to. Wells of this type are far easier and quicker to dig and install then deep wells.
The bad news is that shallow wells tap into water sources that are more likely to contain harmful bacteria, viruses and other endemic contaminants.
Shallow wells are also more susceptible to contamination from nasty stuff leaking through the soil from any contamination hazards that originated from within the ground itself, say something like a septic tank rupture or similar.
On the other hand deep wells, which are the most common type employed today, or any well that goes deeper than 50 feet.
A deep well is typically 100 to 200 feet deep in most places, but they might go as deep as or even deeper than a thousand feet! That is a long, long way down, and wells of this type will always go beyond the first impervious layer in the soil.
This is both a good and a bad thing, as the water quality drawn from these remote and deep aquifers is likely to be free of significant bacteria and viruses, but is more likely to contain a serious amount of mineral contamination.
At best, this will make the water hard, and lend it a somewhat “off” or metallic taste. At worst, it will require significant additional filtration and softening to be made palatable and usable.
Which well is best for you? The answer is “it depends”. There are quite a few factors that go into determining which well installation is the best one, or even possible. Time and expense is definitely one, as is the nature of the terrain and the underlying soil at the location where you plan on digging the well.
Also, a thorough understanding of the aquifers on your parcel might make the choice for you. A shallow well might meet all of your needs at a given location, but you’ll have to keep a close eye on the water for contamination and also be aware that shallow wells are more likely to dry up during drought conditions or in hot seasons.
A deep well is a far more expensive and tricky proposition in the beginning, but supply a greater quantity of water longer, and a supply that is far less likely to be contaminated over time.
On the other hand, the hard water quality typical of deep wells means you might have to invest additionally in water softening, or other treatment technology to make it usable.
As with most things there is no truly correct answer, there are only trade-offs and compromises. Next, we will account for the actual method of installation of any given well. Wells can be installed even today by several means depending on your objective, situation and resources.
Below are the three typical methods of installation they can be employed either using primitive labor, or high-tech modern technology and equipment.
Dug Well
The oldest, simplest and most basic type of well installation, dug wells have been around since humans have been digging wells in the first place!
Even though much of the world employs a variety of power equipment and other advanced technologies for installing wells, wells still have their place in the water finding arsenal because they rely only on the simplest of tools, along with plenty of effort in order to install.
This means they might still be the choice in certain countries or even in remote places where power equipment cannot be brought affordably.
Typical tools used for the installation of a dug well are probably what you are thinking right now: shovels, buckets, picks, adzes and so forth. Despite all of the learned experience humanity has digging wells, they are still limited oftentimes to the shallowest of installations. Only very rarely will a dug well go any deeper than 50 feet.
Drilled Well
Overwhelmingly the most popular and efficient method of installation today, you might be surprised to learn that drilled wells have been around quite a long time, first pioneered and utilized for well-digging by ancient societies.
So long as a society had access to, and could produce quality metal tools, drilling was an option, since the drill head needs to be both hard and tough to penetrate the soil and sometimes harder materials reliably.
Drilling has a big advantage over other methods of installation since it creates a nicely shaped and concentric well hole, and using a basic apparatus can make use of interchangeable drill heads as soil conditions change.
For soft soil and even certain kinds of solid rock, a drill with the correct head can get it done. For hard materials that cannot be defeated in any other way, an impact drill head could be utilized. The deepest wells are only achievable by drilling.
Driven Well
A driven well is a type that is fairly common today, and could theoretically even be employed using primitive materials. A driven well is one where a pipe, acting as a well casing, is hammered or otherwise pounded into the ground, hence “driven”, until it reaches the water source.
This pipe / well casing has a filtering attachment on the end of it, the well screen, that prevents soil and other debris from entering the pipe as water is drawn into it. Driven wells are only suitable for shallow well installations, since various soil substrates grow increasingly resistant to penetration the deeper the pipe is driven into the ground.
Additionally, it is almost impossible to correctly and safely install a driven well in anything but soft ground. Like most shallow wells, driven wells must be particularly guarded against contamination.
How Much Will All This Cost Me?
There is generally nothing inexpensive about the installation of a well, unless you get very lucky or are installing a very shallow well.
Professional installation, testing and maintenance is always going to cost an arm and a leg, but there is still much to commend such methods since they generally ensure a better outcome, and a higher chance of striking a usable aquifer on the first go.
Long story short, the deeper you go, the more expensive your well is going to be, and that is before considering one of several curve balls that might strike the excavation when you start getting really deep.
Consider some of the costs below; you might come away with a different opinion on the viability of installing your own well yourself!
- Well Excavation, Drilling Only: $15-25 per lateral foot.
- Well Installation: $25-65 per lateral foot.
- Total Average Cost of Well: $8,000-$12,000
And that is just the well installation cost for the actual well hole and casing. This does not include all the additional equipment that is required to correctly and safely operate a modern well.
That is also not taking to account the high-side costs of difficult terrain, complicated installations and other problems, mishaps and misadventures that can befall the unfortunate homeowner.
Below you will find a short list of equipment costs but you can expect to shell out for when installing a well of any kind and using any method, professional or DIY.
- Well Casing Pipe, prefabricated: $500-$2,800
- Pressure Tank Assembly: $1,200-$3,200
- Softening and Filtering System: $1,000-$3,000
- Pump Assembly: $100-$2,000
- Wires, Switches, Misc.: $45-$325
Tally all this up and it is easy to see how a well is a major investment unless you are independently and fabulously wealthy.
The cost associated with the installation of a well, professional or otherwise, means you cannot afford to make any serious mistakes as additional expenses will quickly overrun your budget.
You can save a small fortune installing your well yourself, but the cost of the raw materials and associated tools alone is still a significant investment.
It is up to you to assess all of the risks as well as your finances before deciding to pull the trigger on the installation of a well one way or the other.
In the following sections, we’ll be going over in some detail various old-fashioned methods for installing wells that have served mankind for millennia. If you are still thinking of installing a well yourself, this next section is for you!
What You Need to Know before Digging
At the end of the day, digging a well may seem like digging a hole in the ground, but it is so much more than that…
No matter how you try to tackle the project, it is going to be an awful lot of work and not without risk, as anyone entering the well hole will always be at risk of a cave-in no matter how nice and neat you make the hole itself.
Beyond the physical parameters, there might be the issues of licensing and permitting that need to be addressed depending in your locale before you can even begin digging.
Your parcel must also be assessed to determine if it has a viable aquifer and where it is located. Learning to read and understand the geological charts and previously conducted water surveys is a skill unto itself.
Before you grab your shovel, your bucket and three of your closest friends to help you read over the following considerations, tips and procedures to help you get your ducks in a row before embarking.
After that, we will assess and analyze some primitive methods for digging a well that might serve you if you ever need to dig a well in a low technology setting or just in the aftermath of an SHTF event.
Selecting Your Well Site
Proper selection of the well site is the single most important element of well installation. Getting this part wrong means you are going to waste a ton of time, effort and money, and wind up without any water at all in the end.
While it is true that if you dig deep enough pretty much anywhere you will eventually strike water, only through careful assessment of the terrain and underlying geological factors can you ensure you’re well will be installed as efficiently as possible with a minimum of fuss. Remember that every single foot you descend has a significant dollar value attached to it.
The two keys to site selection are ensuring it is situated atop a productive aquifer and doing your best to avoid any location which will make for difficult, high-risk digging. Even so, sometimes you might not have a choice, or you might have two marginal choices that you will have to choose between.
For instance, you might have a deep aquifer capable of producing copious amounts of clean, pure water that will be really tough to reach, meaning much hard digging or drilling.
Or you might have a shallower one that is much easier to reach, and far quicker, but will produce water of marginal quality and remain more vulnerable to contamination no matter what type of well you are installing.
You might have a “third way” option that is somewhere between these two extremes, but it could potentially be located too close to a source of contamination, or along a potential vector for contamination in the case of the typical flow path of rainfall.
If it sounds like everything is just a series of trade-offs when it comes to digging a well, that is because it most typically is, although a lucky few people manage to find a “honey hole” well that is easy to reach, deep and fantastically pure.
Nonetheless, there is only so much you can do when it comes to assessment, research and analysis. Eventually, you will have to choose a site, commit to it and break ground!
Avoid Contamination at All Cost!
When it comes to locating a well, if half the battle is knowing where to situate it, the other half is knowing where you should not situate it if you have any choice in the matter. I’m referring to contaminates, and to potential sources of contamination.
Every single well, no matter how sealed, no matter how professional the installation, and no matter how deep it goes is still vulnerable to contamination, both from above ground and from within the very soil itself.
The type of well you are installing, shallow or deep, also plays a big part in this as discussed previously, as shallow wells are significantly more vulnerable than deep wells, though deep wells are not invulnerable.
Anything that you don’t want in your water can potentially leach through the soil or soak into it from the surface and make its way into the water that is bound for your lips. This can be a major, even life-threatening, problem!
A contaminant could be man-made or all natural, but wherever it came from you definitely need to take pains to keep it out of your water supply.
Some typical natural contaminants are things like oil deposits, marshland and swamps, liquids that will contain either chemicals, or bacteria and viruses respectively and in great abundance.
Man-made contaminants run the gamut from septic and sewer systems to above-ground dumps and refuse repositories to spills of chemicals from commercial or industrial endeavors.
As a general rule, your well must be located at a bare minimum of 50 feet away from any potential source of contamination and more distance is always better.
But just because you are steering clear of these sources of contamination does not mean your well will not become contaminated!
You must account for the flow of water above ground and always try to situate your well so that is unaffected by these flows, as it is possible that rain could carry a contaminant from far off and then let it leak into the soil around your well or even directly into it. Neither is a good outcome for you!
It must be said: As with any other project that involves digging, ensure that you check with all utility companies that are in the area, if applicable, and make sure you’re not going run into any buried lines, pipes or installations!
Get Your Water Tested!
Even if your well is being situated in an area with an aquifer that is as reliable as anything and famous for producing clean and high quality water, even if the well itself is installed without a hitch, you must always get your water tested before you drink it. Failing to do so could be a nasty and potentially lethal surprise. You cannot rely on a sniff or taste test.
All kinds of nasty biological, metallic and mineral contamination could be present in that water. The only way to reliably and certainly discover its contents is through laboratory testing, and a simple internet search can furnish many labs that can handle this for you in your area.
But what if, in the scenario we have been planning for in discussing, there are no more Laboratories and no more scientists who can test your water for you? It would be in your best interest as a prepper if you knew how to perform even a rudimentary test on the water you produce from your newly installed well.
This will require a little bit of specialized equipment and perhaps a few chemicals, but knowing how to check for the presence of the most dangerous water contaminants could spell the difference between success and disaster in a long-term survival situation.
In short, always get your water laboratory tested if in any way possible, but if it isn’t, you should know how to do such testing with what materials you have on hand.
When In Doubt, Hire it Out!
This is probably the last thing you want to read on a website that preaches readiness and personal responsibility when it comes to handling your problems, but when it comes to digging a well you really, really should consider calling a professional if it is possible. Why?
Simply stated, your time alone is worth money, and no matter how you are digging or otherwise installing a well it is a highly laborious and error-prone undertaking that can potentially end with you wasting a ton of treasure.
While the actual digging or drilling of the well is comparatively simple and totally within the grasp of most people who have a spirit of ingenuity and DIY aptitude, it is everything that comes ahead of the actual digging that requires the most expertise, consisting of all of the things we have discussed up to this point.
- Where do you site the well?
- Where are the hazards and which ones are bad enough to consider moving the well to a different site?
- Do you know how to read your land in geological surveys?
- How are you sure that you are directly over the aquifer?
- Is your dig path even aimed at the aquifer?
- If you are going deep, are you sure that you can breach the aquifer without irrevocably contaminating it?
There is no shame in admitting that you might botch up a complicated job you are untrained for, and inexperienced in performing.
If you have the option and you have the money I definitely recommend you have professionals install your well, and you can even have them install it before you need it in an emergency situation. Anticipate problems, and you won’t have to deal with them in a time-is-life situation later.
Time to Dig: Methods for Installing Your Own Well
The various methods I will share with you below have all been used throughout the course of human history to dig and properly finish productive wells around the world.
A great many of them are still used today in various places where communities or groups are short on machinery but big on manpower.
By understanding a few simple mechanical principles at work, you can employ rudimentary tools and materials or even natural resources in the construction of machines that can drastically help speed up the digging process while saving effort and energy.
Make sure you add a few of these to your survival repertoire so you are prepared for all eventualities!
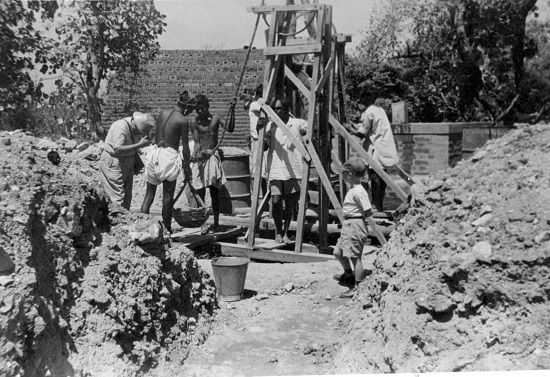
Hand Dug
Hand digging is the most archaic, slowest and labor-intensive of the well excavation methods, but the one that has probably installed more wells than any other.
The procedure is simple, though far from easy: Teams of workers utilize hand tools like shovels, picks and buckets to remove the dirt beneath them, and create the well hole which will be cased later.
The cuttings of shifted rock, dirt and other material is loaded into buckets and then either hauled to the surface or pulled up using a rope and container. There is really not much more to it!
The good news is a hand-dug well can be installed by anyone, or by any group that is capable of using hand tools, and withstanding a few blisters.
The bad news is that these wells typically must be a much larger diameter than other wells in order to accommodate the workers who physically stand in the bottom digging and working away at it.
These wells can only go as deep as the first water source struck, as people cannot dig underwater, obviously!
That means the hand dug wells will rarely ever be deeper than 50 or 60 feet, though I know there are a few examples from around the world that went quite a bit deeper, around a hundred feet.
On the bright side, this wider well hole will produce more water at a given depth than a narrower one but their disproportionate size also makes them more prone to accident and contamination.
Drill / Auger
Drilling is an option, and not just for big rig trucks and all their attached machinery. Humans are more than capable of powering an efficient and effective drill for excavating a well hole.
This drill consists of a long shaft, or sequentially attached shaft sections tipped with a drill head. Attached cross pieces at the top serve as handles and a simple gantry for keeping the drill centered and stable allow teams of workers to turn it by pushing in unison.
Periodically, workers are sent to the bottom to excavate the cuttings, or with more advanced drill heads that will hold the cuttings it will be pulled up in order to be empty before being reinserted.
Conventional drilling works well in any area where the soil is reasonably soft and you don’t expect to run into too many thick layers of impenetrable rock.
You can go quite deep with a drill, and make a nice, concentric well hole but it will get harder and harder the deeper you go. As resistance increases, the shaft and other components must be made correspondingly harder lest they break under the strain.
One specialized drill head, called a percussion or impact drill, can be utilized when the hardest materials or heavy rock is encountered. This does not function in a rotational manner, but is instead raised and lowered using an articulated pole or a rope and pulley before being dropped onto the obstruction below.
The sharpened, hardened impact drill head will crack and shatter the rock to allow for easy removal.
This is an operation that requires considerable coordination and teamwork along with a fairly advanced tool head by the standards of primitive techniques, but this might be the only way for you to defeat serious obstructions in the excavation.
Sludging
Sludging is an interesting and surprisingly old technique for well-digging that uses a trick of physics in order to excavate its cuttings from the well hole. I will try to describe this as best I can.
A hollow pipe is mounted to a fixture on top of a slightly oversized well hole ready to be raised and lowered into the well casing by team of men using ropes and pulleys. The well hole is to be full of water near the bottom.

In operation, the pipe is released and allowed to drop or is otherwise driven into the bottom of the well hole where will bite into the soil. One member of the crew standing near the pipe then covers the top of it with his hand in order to seal it before the crew raises it back up to the surface.
Next, immediately before the pipe is lowered again, the crewman covering the hole at the top removes his hand which allows the cuttings and some water to slosh out. From here the process is repeated, slowly but steadily excavating soil from the well bottom.
As you might expect, this is an operation that requires an extremely high degree of teamwork but it has its advantages because all the components needed for success are simple, easily assembled, and can even be made from natural materials like bamboo.
One disadvantage is that this method will only work in the softest of soils, as a pipe has very little cutting ability to deal with hard soil or rock.
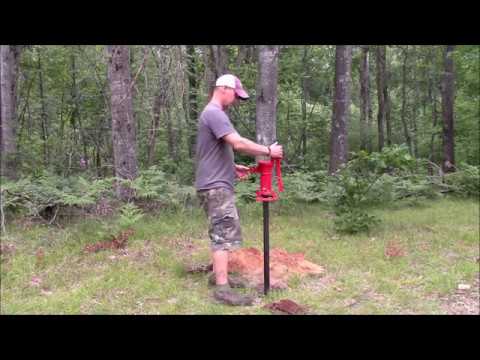
Drive Point
A drive point well is among the simplest of installation methods. So simple in fact it can easily be installed by one person and sometimes in as little as a day and ideal soil conditions.
A drive point well relies on a few prefabricated parts, consisting of a perforated pipe that functions as the well casing, and well screen being tipped with a hardened, metal point before being driven into the ground.
This pipe cuts the well hole and serves as the well casing in one fell swoop, saving both time and labor. Once it reaches the water source and is in place, your well is practically ready to go.
A single person using a sledgehammer or other pounding tool can make good headway using a drive point well system, but they have some significant drawbacks, namely they only work in comparatively soft soils, and can only ever be used for shallow wells, typically ones going no deeper than about 20 to 30 feet.
Because soil reaches maximum compression very quickly, and you are essentially trying to penetrate it with a giant nail of sorts, even wailing away with a heavy hammer will produce little progress once it gets towards its maximum depth.
Drive point wells are commonly utilized near pre-existing large bodies of water that have loose or sandy soil around their shores. Terrain like this is ideal for installing a drive point well, even more so if you do not have particularly high water demands.
Conclusion
A functioning well is one of the only ways to reliably procure water away from a major above ground source. Humans have been digging wells for millennia in a great variety of ways, and while these methods are definitely archaic, they are by no means worthless.
Those same methods might enable you to dig your own well when modern methods are out of reach, and can serve as a vital contingency plan in the aftermath of a major catastrophe that leaves public water a distant memory.
The water is definitely there for the taking, you need only to supply the grit and know-how to reach it!

Tom Marlowe grew up with a gun in his hand, and has held all kinds of jobs in the gun industry: range safety, sales, instruction and consulting, He has the experience in helping civilian shooters figure out what firearms work best for them.
Well drilling varies enormously by the geology of where you live. I’m located in the Appalachian mountains, and even in my location, the depth/flow of wells varies a lot.
Within a 1/2 mile of my house, the shallowest well I know of is 60′, and is almost artesian in that the water is right at the top of the casing at ground level. The deepest is 720′ and only puts out about a quart/min. I’ve had 5 wells drilled on properties I own in this valley. The best was at 350′, puts out 30-40gal/min (you can’t out pump it) of good clear water. 3 of the 5, including the one on my home place, hit a vein of red clay mud at some point, and when pumped, the will put out clear water for 50-100 gallons, then the water level drops enough that incoming water to fill the casing runs over the mud vein, turning it orange. I only use mine for garden irrigation, as the mud is nearly impossible to even filter out….just too much of it.
Our primary water source is a year round spring. Too avoid contamination problems, it runs thru a 5 micron whole house filter I change the filter element on once a month, then into an 8gpm UV light to eliminate any bacteria. The bulb on it is changed once a year. A UV setup like this can use any source of water where biological contamination is suspect, or subject to change, and is far cheaper than drilling almost any well.