
Sandbags. One tool that is indispensable for dealing with rising water, be it from a river that has crested its banks or a biblical deluge that is turning a once dry suburb into a drowned wasteland.
Sandbags are laborious to fill and take time to emplace, but there is little that can do what they do for preventing and mitigating damage caused by water.
Everyone knows about that use of sandbags, and they are a common enough sight after tropical storms, hurricanes and flood watches, but smart preppers know they are good for so much more. In this article we’ll offer you several ways to make use of the crate of sandbags you likely already have stashed away for a rainy day.
Getting to Know the Humble Sandbag
Sandbags are easy to store, cheap and can help your improve your situation in all kinds of ways, whether you are bugging in or bugging out. As we’ll soon learn, from construction to fortification, sandbags are an invaluable low-tech effort multiplier, able to assist you before, during and after a SHTF situation.
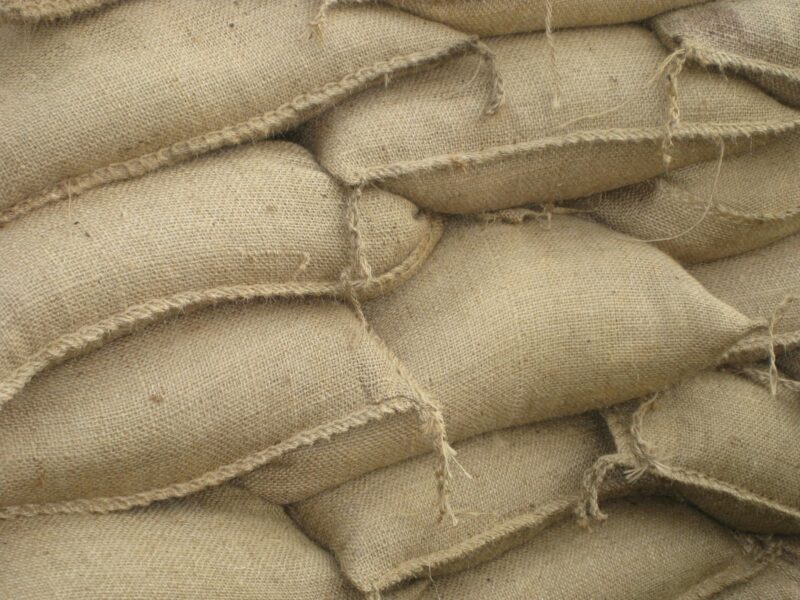
Your typical sandbag is made from polypropylene though you’ll occasionally still encounter ones made from canvas or other natural fabrics.
The cheaper synthetic ones have the advantage of being, well, inexpensive and they are also lighter when empty and lay very flat in a container for storage. Disadvantages of synthetic sandbags include greater vulnerability to UV light and abrasion.
Canvas sandbags are more expensive, heavier compared to their modern cousins and bulkier when compressed, but they resist UV light wonderfully, though rot can be a problem wet or dry. Either type can work well for you.
Filling sandbags is best accomplished via specialized heavy machinery that can scoop good, clean, washed sand or similar fine dirt fill en masse into multiple bags at once.
But since this is a prepper site and you probably don’t have that kind of equipment (or even particularly clean sand!) you’ll have to make do with old fashioned muscle power and hopefully a few tools and friends.
Helpful items include a purpose-made sandbag filling kit, but barring that you can make do with a trusty shovel of some kind and a funnel for helping you speed up the filling process with less waste and effort. If you don’t have a suitable funnel, find a traffic cone or small trashcan.
Cut the end off to allow your fill to glide effortlessly through and you are in business. It is a simple matter to construct a fixture to hold the funnel if you are filling by your lonesome.
Important Guidelines for Sandbag Use
Before we hop to our list, there are two things to keep in mind when it comes to using sandbags. For most of the uses on this list, you’ll need a bunch of them. Very literally tons of them.
Sandbags take time to fill, so you’ll need to get started as quickly as you can when you know the time is coming, and then do everything at your disposal to speed things up. Again, the more the merrier. Well, nothing merry about filling sandbags, but you’ll get it done fast!
When filling a sandbag, the golden rule is to only fill it about 2/3’s full. Definitely not all the way. Why? Simple: you want your sandbags to be malleable, not plump and firm, so that they will mold to each other better when you stack them in position, be it for flood defense or protection from gunfire. This also means you won’t need quite as much fill as you are thinking, and you’ll be able to fill most sandbags with one or two passes of the shovel.
Other than that, it is down to what you need to do! Read on for more.
10 Ingenious Uses for Sandbags
1) Flood Protection
Using sandbags to protect your home and, possibly, your lives against a flood is a doable but, let’s be honest, excruciating and difficult task. That is, unless you are fortunate enough to be as well equipped as some flood-prone municipalities.
No matter how you get them filled though, you can use sandbags to block, redirect or funnel water away from your domicile and other vulnerable pieces of property.
Again, this will take a ton of labor and plenty of time, so enlist or conscript as many people to help as you can. After you have your labor source, a ready source of soil and the true grit needed to see it through, the only thing left to do is build your revetment.
There are a few key concepts when building a flood wall, and you had better pay attention and do it right because a moving mass of millions of gallons of water is one of the most powerful forces in nature. Any weaknesses will see your levee breached.
The first step is to fill the sandbags only 2/3 of the way full per the above section. The next is the placement of the bags themselves. No matter how you are configuring your sandbag wall, any row should have the bags placed short end to short end, snugly.
The neighboring row on the same level should be placed so the middle of the first bag is centered on the “joint” of the first row. As you build higher, follow the same guidelines but lay the next higher row’s first bag atop the joint of the row beneath and then follow your steps from before. This will maximize strength and help prevent leaks.
Any flood wall should be three times wider at the base than it is tall to ensure it has the strength necessary to resist the water pressing into it. You can use this info to make a coarse estimate of how many sandbags you’ll need to beat the expected height of the flood water.
One more thing you can do to really put your flood wall on the next level of protection is to line it with heavy, thick plastic sheeting, like the kind you can get on a roll at home improvement stores. This will help waterproof and further prevent leaks. Start the roll on beneath the bottom most, water-side row before you build the wall higher, then tuck it under the topmost row on the dry side as you complete it.
Be sure to leave the plastic generously loose, not taut, so that it can deform and stretch into the sandbag wall as the water hits it. Too snug a fit will see it tear and puncture.
2) Gunfire Protection
All those snaps and vids of our brave warfighters filling sandbags must tell us something. Since a long, long time ago, people who were expecting a gunfight and had time to prepare would take the time to improve their positions by digging earthworks and filling sandbags with either the eponymous sand or just dirt.
Lining a bunker or stacked into a low wall, our fighting men would take aim at approaching attackers or hide from incoming bombs and shells behind thick and hefty.
Sandbags, filled and stacked properly, provide excellent protection against gunfire and even explosives for as long as the sandbags hold up. While they do degrade under multiple repeated hits, they are surprisingly resilient against small arms fire.
The best thing about sandbags on defense is, even though they are heavy and take time to prepare, you can fortify nearly any place with them! Want to turn your home into veritable fortress?
Place some simple ‘U’ or ‘V’ shaped waist high barricades beneath the window sills to make a firing position with proper cover. Need to barricade a door? Sandbags! Though take care that you don’t potentially cutoff an escape route against invaders or a fire.
If this is something you want to incorporate into your preps, take the time to grab some military manuals on defensive emplacements and field works; you’ll have more ideas than you can shake a stick at.
3) Construction
Sandbags are eminently useful as construction components for making all kinds of above and below ground shelters. Filled with sand, dirt, or a concrete and sand mixture, sand bags are durable and certainly able to support a roof and resist heaving and wind.
Sandbag construction techniques vary depending on what you need to accomplish, but are more or less easily learned and implemented. The hardest thing, per usual with these little wonders, is filling them when you need them.
You can use sandbags in subterranean applications to lend additional strength to dirt walls and even help jack up ceilings since soil and sand do not compress too readily. As a sort of “self-making resource” when tunneling (you’ll have plenty of loose dirt!” they make a lot of sense for the purpose.
Your sandbag walls and columns can be reinforced with beams, plywood sheeting, concrete, rebar, and many other materials and techniques. A composite construction wall with sandbags as the core or the out layers is strong and tough indeed!
This is another skill you should read up on before you need to employ it, so take the time now to at least learn the ropes before things get hairy.
4) Getting a Grip
You can add several sandbags to the rear of a rear-wheel drive vehicle (preferably overtop the axles) to improve the tires’ bite into a slick surface whenever you need more traction.
This is easily accomplished in a pinch if you keep a stack of sandbags with you inside your vehicle. No matter where you are you will always be able to find a ready supply of sand, soil, or even gravel to fill your bags with.
When placing the bags, try to get them as directly overtop the wheels as possible. Trucks make this easy, but the arrangement of some vehicles’ interiors can make this trick. In a pinch, you can always lay them on top of your vehicle or over the door sills.
Do take care before you employ this trick on soft or muddy ground, as additional weight is even more likely to cause sinking into the mud and mire, getting you hopelessly stuck.
In such a case, you can always try to use the sandbag itself as a sort of pillow to get it under the tire, hopefully giving you enough traction to get you out of the rut you got yourself into. This works similarly to the old trick of employing one of your floor mats for the same purpose, and this will save your floor mat!
5) Wet Storage
You can use most sandbags to conveniently stash wet, muddy or otherwise nasty boots and other apparel that gets too nasty to tolerate bumping into the rest of your stuff. Your modernized plastic sandbags are especially well suited to this task since they are far less permeable than older canvas ones.
Another use, though not an entirely pleasant one, would be as an emergency waste or trash bag. Though no one wants to do their business in a bag, it is a far better prospect than unloading in buttoned-up vehicle or basement where you are sheltering to ride out a SHTF event. You can line the sandbag with a little sand, shredded paper, or kitty litter to help control moisture and odor.
Remember how flat and easy to store sandbags are? A small stack of these in your trunk, or a few in your BOB as overflow storage are just the ticket for dealing with wet or nasty messes and they weigh next to nothing and take up almost no room when filled.
6) Weights
Sandbags are heavy when filled, and I am sure you have seen me harping on about it through this through this whole article. Instead of griping about it, embrace it: you can always easily fill up sandbags to make improvised dumbbells, or dangle them from a sturdy pipe, pole or bar to make a barbell.
Used freehand, you can vary the distribution of the sand and your grip to work major muscle groups as well as your grip simultaneously. Thrown over your shoulders makes for a vicious squat or lunge workout. You can clutch them to your chest and take your sit-up game to the next level.
Plyometrics are also a good bet for adding some sandbags for resistance and challenge. Box jumps, long jumps and more can all be executed safely with small sandbags. Added to a backpack you can greatly increase resistance for walking and running.
Embrace the austere gym! Use sandbags!
7) Shooting Rest
There is a reason most of the best shooting rests for stock and forend are filled with sand. Nothing beats a sandbag when it is time to really get steady. Sandbags are sort of uniquely suited to being shooting rests by virtue of their behavior.
A sandbag that is filled to a malleable plumpness (how much exactly is a topic of contention among precision rifle shooters) will cradle the gun at contact points and also spread out and conform to its contact surface, allowing you a soft, steady and still minutely adjustable rest at the fore or aft of the gun.
You can squeeze a sandbag to ever so slightly raise the gun, or slacken your hold to lower it. They also better allow the gun to recoil in a predictable way compared to bipods which have a tendency to hop on firing, reducing consistency.
A common sandbag is too big for use on the move, but you can cut one in two and sew or tape it shut to make decently sized ones. Alternately you can keep a sandbag handy at any shooting position or hide where you expect to make use of a long rifle, ready to go.
8) Improvised Tarp
Lacking a tarp? Not if you have a stack of sandbags, a roll of tape and a knife or pair of scissors! You can easily cut sandbags along their seams and tape them together (when dry) to make a picture perfect and vaguely plaid tarp!
This tarp will have all the characteristics of your sandbags, so if they are water impermeable, you will have a water proof tarp. Water resistant? Same thing.
This trick works best if your sandbags are new and clean, and they absolutely must be dry. Get extra mileage out of your new tarp by taking the time to make sure all of your connection surfaces are flat and the tape gets a good, bubble and ripple free bite.
Speaking of the tape, a high-quality, super thick and super sticky duct tape works beautifully here, lending even more strength and longevity to your homemade tarp. My current faves in state-of-the-art tapes are Gorilla Tape and T-rex tape.
9) General Storage
Since forever ago, man has had plenty of use for sacks. Hunting, gathering, organizing, separating, compartmenting, the uses are endless. You can easily justify the inclusion of a few sand bags into your BOB or GHB and certainly in your vehicle for the purpose. You might need to keep track of small parts picked up or removed in the dark.
Spare bits, small parts, separate kits, found items, or overflow to hand off to family, friends or strangers, sometimes you just need an extra bag or pouch. You can even rig up a carry handle or shoulder straps using the bags own drawstrings or some tape.
10) Survival Essentials
A sandbag can be stripped down and dismantled to yield all kinds of survival essentials in a pinch. The string can be harvested for light duty lashings, fishing line, or snare cord.
The bag itself will burn off a thick, black smoke, useful for signaling. Tiny strips of the bag can be made into trail markers, or longer strips can be braided or twisted into cordage or rope. A square of the material can patch a tent or jacket.
You can add ice and alcohol to make a cold compress. A tiny section, notched into the correct shape and daubed with super glue makes a handy butterfly bandage.
You can fashion it into a windscreen for a candle, or shred it and fill trash bags with it to make surprisingly passable insulation. Boot covers and even shin high waders can be field fashioned readily.
All preppers know there is much to be said for improvisation and adaptation. Sandbags are another item you can get plenty of emergency use from besides their primary “macro” purposes in an emergency.
Trust me, these guys deserve a spot in your BOB and vehicle kit, and make sure to have a big stack of them at home in your stash.
Conclusion
Sand bags are the solution if you need cheap, on demand solutions for gunfire of flood waters, but you can get so much more utility out a simple sandbag than that if you know what you are doing.
Take the time to brush up on the techniques presented in this article and you too can be a survival sandbag superstar.

Tom Marlowe grew up with a gun in his hand, and has held all kinds of jobs in the gun industry: range safety, sales, instruction and consulting, He has the experience in helping civilian shooters figure out what firearms work best for them.
With a typical stick built American home using sandbags INSIDE your home will cause structural failure. Your floor joists are NOT made to support that kind of point loading. Aside from that if your defending FROM your home do you assume the attackers will be so polite as only to attack from ONE direction? Nothing in a typical home will stop any bullet larger than 22 LR and even the little 22 LR will go through a LOT of American Home construction. Fire is also a concern for defending the very flammable American stick built home.
In short Defend from OUTSIDE your home. Build your fighting positions with sandbags outside your home.
Great article Mr. Tom
We have a bunch of them and also store a pallet of bags of rocks in the barn. We use them for many applications that you referenced.
While stationed in Kodiak in the USCG, I ran across many, MANY “pillboxes”in the woods constructed by our GI’s in WW2, of sandbags filled with concrete. This is where the old burlap sandbags reign as king! Fill the sandbags with wet cement and stack like brickwork. The concrete will leak between the bags and bond them together. Though the bags that formed those pillboxes were long gone, the protection they created remained, 40 years later, and were as strong as when they were first constructed!
Tom MacGyver,
We’ve done something similar with shot bags, burlap bags, or the unopened concrete (Quikrete) bags, dry stacking. This makes them a little lighter and just plain rain or other humidity will eventually work into the dry mix and allow it to cure and harden. Last summer we found a few bags that had been stored like this by a friend, and this spring we have to try and remove these large roundish boulders from a shelf in one of the barns.
We have used sand bags on the shooting range to collect lead from target practice it makes it easy to sort out .the bags last one season and we can reuse the sand over and over ,need 4 deep for most calibers ,just make sure you have a back stop for the misses. I know you never miss ,at least I don’t HA HA
0ldhomesteader,
This is a good idea and certainly beats sifting through the backstop looking for bullets and other bits of lead.
We’re in the process of rebuilding our backstop this upcoming spring and will keep this in mind.
Filling sandbags, especially when by the hundreds or even thousands, can be really tough (ask me how I know). I did learn that if you can get a wooden sandbag filler made (essentially a funnel) the job is easier and you can use a bigger shovel to throw the dirt. Without such a filler, you will have to fill by hand and a military entrenching tool, or a sod spade, works best. They are narrower and fit into the sandbag opening better. Three-person teams are also the best. One shoveller, one bag holder, and one bag tier. Everyone can swap off jobs periodically. The shoveller and holder should wear gloves. The shoveller to avoid blisters, and the holder to avoid sliced fingers. In the event you have to fill bags by yourself, the military e-tool is the best. But a three-person team can fill a lot of bags in a day, even with periodic water breaks.
The really best way to fill sandbags, is to get two idiots to decide they want to be conscientious objectors after they get to the combat zone. 12-hours or more a day, no days off, filling sandbags, takes a big load off the other troops who are willing to do their jobs properly. 🙂
We live on high ground where the soil can get soggy; but, we are well above any flood plain so don’t need sandbags for this.
For you listed uses:
4) Getting a Grip
6) Weights
We find that bags of cat litter work well. Since we have cats, it doesn’t go to waste, and in the snow, shoveling litter under tires can add traction when you need it.
Cat litter also comes ready to go, already in bags and doesn’t have to be shoveled into empty bags.
7) Shooting Rest
This is one place we do use them; but, since many of us reload, we have empty canvass shot bags available at no cost. If you first stuff an old plastic bread bag into the shot bag, it keeps the sand from getting too wet and heavy should you be on the range in a downpour.
Road construction cones can make great funnels for filling sand/ dirt bags. Dog food bags make a cheap alternative bag and seal with duct tape, I save puppy’s empty bags for this reason. You can spray paint to camouflage.
I recently discovered a fascinating video comparing various caliber bullets to crossbow and conventional arrows in attacking a single sandbag. All the bullets could be stopped by one or one-and-a-half sandbags. All of the arrows punched through with plenty of power left over. I believe this was due to a combination of the bullets speed and their tendency to turn sideways quickly.